Monday, November 22, 2010

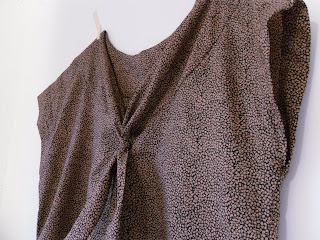
Celebration Blouse

Last Friday I handed in the first draft of my thesis. Sixty pages on early Soviet Constructivist architecture, communal housing and socialist utopianism, in case you were wondering.

To celebrate my freedom from the prison that is MS Word, I started flipping through the Stylish Dress Book to service my need for some decompression sewing. Using style J as a guide, this baby sort of just came together. Not a bad way to spend a Saturday afternoon, if you ask me.
Not much to say, so I'll just show you:


The fabric was not especially fun to work with. A synthetic chiffon I used for my (vegan) sister's performance dress, it was quite prone to fraying, and difficult to mark and press for pintucks. Let's just stay there was much basting and stay-stitching involved.


But, man, was all that extra prep worth it. I am in love with this top.

Friday, November 19, 2010

Wool Winter Coat


Despite what a hefty project this is, and how busy I've been, I'm surprised this came together so quickly. And it did so mostly out of necessity. I got rid of a lot of stuff this Fall, including some old jackets and coats. Now that the temperatures have started to dip below freezing, it occurred to me that I should probably procure some kind of replacement. So this coat was born.


First of all, I should say that, with the exception of restocking my interfacing supply, I did not buy any new materials to make this. I've had the wool for a while with the intention of making a coat. But the rest of the notions, including the heavy-duty zipper were already stashed. So in that regard, I'm pretty proud of myself.


About the pattern: I heavily modified BurdaStyle's Talea coat pattern (free!). I left out a lot of the design details, like the tabs at the shoulders, sleeve hems, and back waist. I drafted my own collar for something a little less dramatic, and I completely redrafted the center front facing to accommodate a zip-closure. There were some fit issues to compensate for as well, some of which weren't resolved as well I had hoped.


This project also marks my first foray into hardcore tailoring. I took a lot of inspiration from Gertie's Lady Grey Sew-Along which was winding up as I was making my coat. The collar is fully pad-stitched, and I paid special attention to setting in the sleeves (sidenote: do NOT underestimate the power of shoulder pads. Amazing.).


Regrets: This is always an issue for me, but I probably should have given myself a little more room in the bust. I think I didn't take enough out of the waist, and I drafted out too much ease through the hips.
In all likeliness, I will probably redo the placket covering the zipper (it could use some sturdier interfacing) and I may add some loop and toggle closures to help it lay flatter across the bust.

Overall, I am incredibly happy with the final product. I probably would not use the pattern again for how much I changed it. But now I have a nice, comfy, cute coat to keep me warm, which was the objective.

Thursday, October 28, 2010

The Tie-Collar Shift


After packing away my summer dresses a few weekends ago, I felt like I needed to fill a small void in my closet. I have SO MUCH fabric laying around from various thrifting adventures and a recent haul, and this particular print has been calling out to me, practically begging to be turned into some sort of fall garment.

I used up most of a Sunday putting this together, but it was worth it, I think.
The pattern was kind of a fluke. I just cut a basic shift silhouette, and when it ended up being too wide, I pinched in about an inch and a half down the center front, sewed it up, pressed it flat and topstiched it down. Voila, faux placket. Then I took some gape out of the back neckline with two small pleats.


The collar was draped right on my dressform and I drafted some long-ish ties.
The arm opening is one of my favorite treatments; it comes from Colette Patterns' Sencha blouse. Finished it up with some small black buttons and a shirt-dress style rounded hem.

I have to say, I'm pretty into it.

Sunday, September 19, 2010

Peggy Olson

And now for something completely un-wedding-related:

I have been obsessing over this dress worn by Mad Men character Peggy Olson ever since the episode aired.


The neckline, the print, the colorway... fantastic.

Monday, August 16, 2010

The Mockup Saga: Completion?

So I've been working on and off with this beast (mostly on), and I am happy to say, we have a dress. And not only that, and incredibly well-fitted dress. For reals, I am so excited about how this dress looks and feels on my body. It's like buttah.

Without further ado, my wearable mockup:


I have yet to hem it and add a hook and eye at the back zip, but she's "done" for now.
I'm thinking I might toss it in a dye bath, too. The print is a little too much for me. I'm a grays and blacks sort of lady, so I might have to gloom up the red and yellow floral with a more muted wash. I just need to test out some swatches because the sheer self fabric is some kind of synthetic blend and the lining is cotton. Hmm.

Also, here's a bonus "insides" shot just because I am so pleased with my work:


Final thoughts before the actual dress?
- I'm toying with the idea of an underwire.
- I need to figure out a plan of attack for a lapped zipper or loop/button placket.

That's all for now. I'll probably post on the outcome of possible dye adventures.

Thursday, August 5, 2010

Wedding Dress: Mockup 4.0

Between work and life and other projects, I've been working semi-diligently on my wedding dress. After three or so muslins, I've got my fit just right.
So now I've been thinking quite a bit about construction. With my sister's performance dress, I've had experience making a formal fitted dress with some internal structure, but I think my sewing OCD is really going to kick in on this project. Particularly with this mockup, which I hope will turn out to be a wearable run-through of the final dress construction. I have a sheer floral print in my stash - a similar weight to the silk I'll be using for the dress - for the self. Then I'll be using an underlining and lining, which for this version will just be muslin.


Right now I've got the lining and underlining pieces basted together, and mostly sewn up. Boning channels are sewn in, and now I'm working on hand-stitching down all of my seams to the underlining.


I've taken a lot of inspiration from Melissa, who has been posting on the process of making her own wedding dress, as well as this book she recommended (the chapter on bodice construction is available as part of a limited preview on Google Books!).

I'll be back with another update (hopefully with some less crappy photos) once I get the bodice sewn together.

Saturday, July 24, 2010

For the 'Maids

Hello little neglected blog.

Most of my update-mojo has been absorbed by the wedding blog and flickr... but I wanted to post a little something I've been working on. Okay, I totally rolled my eyes at myself typing the words "little something." In actuality, I have been designing, drafting, grading and sewing up dresses for my three beloved bridesmaids (i.e., not a small endeavor).

Anyway, here are some visual anecdotes of this process.


The bust darts are a little pointy. I think I'm going to open them up and steam them flat, as recommended in Gertie's post on French darts.


You can see more of my wedding inspiration in this post on the weddingblog (wedlog?) and more sewing goodness in this flickr set.

Sunday, June 27, 2010

This is SO cool.

The Victoria and Albert Museum site has a really cool image-to-patchwork pattern maker.
The way the program abstracts the image can vary by degree of pattern difficulty and the amount of colors you like to use, which in turn effects how closely the pattern reflects your orginal image. I actually prefer the abstraction.

Here's what I came up with using this original photo (taken of a peacock at the Buffalo Zoo)
With 10 different colors and on medium difficulty, the patternmaker generated this pattern

View the details and download my pattern here.
Look at the galleries and make your own pattern too!

Sunday, May 23, 2010

I'm getting married

You can follow the madness here:
http://gabbyandjoe.blogspot.com/


In addition to documenting the planning process, I'll be posting most of the wedding-related craft/DIY projects there.

Sunday, May 9, 2010

A Grand Undertaking

This spring, I designed, drafted, sewed and embellished a fitted, formal evening gown from the ground up. I am beyond proud of myself. In fact, I feel as though I have crossed some kind of designer/seamstress threshold.

It started when my little sister asked me to create a dress for her to perform in (she is a mezzo-soprano studying at the San Francisco Conservatory of Music), as she had been chosen as a soloist to perform with the Marin Symphony Youth Orchestra. Inspired by her selections for Carmen, Lakme, and Samson et Dalila, we opted for a full-length, flowy, and somewhat phoenician-inspired look.

It might be best to show you the process in photos:


Had to address some fit issues between the cups. But that was pretty much it.


The guts. I was really happy with the finishing inside.


(Click to enlarge all photos.)
It was a learning experience, for sure. But I've become so much more confident in my drafting skills and my ability to interpret initial ideas into a final piece. Now I am totally set on making my wedding dress. It's going to rule.